Roof anchor points, ah the fun of height safety!
Before we examine the process of installing a roof anchor point, there is some essential housekeeping that we need to take care of. The consequences of improperly installing an anchor point or choosing the wrong anchor point are severe! If you are not qualified to install an anchor point, don’t even think about attempting the following DIY guides.
Save money on your renovation on other areas of your project, but don’t compromise on safety! If in doubt, call the professionals.
The following information is only provided as a guide so that you can be informed of the processes that professional anchor point installers use when installing temporary roof anchor points on residential properties. All of the manufacturers include their own installation guides with each product.
Don’t be intimidated by the range of roof anchors available on the market. All you need to know is a few key factors that will determine which anchor point is appropriate for your roof.
What Type Of Roof Are You Installing The Anchor Point On?
Anchor points are designed for specific roof surfaces including metal, tiled, concrete and sealed seam roofs. Each manufacturer has a range of temporary and permanent anchorages for each roof type, so identify the right product for your roof type that suits your budget.
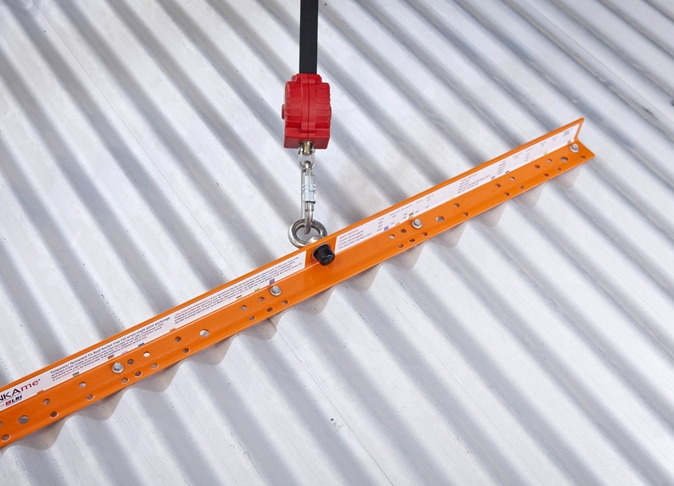
ANKAme Temporary Roof Anchor
If you run into a Bunnings on a Saturday afternoon and ask for a roof anchor, fair chance that the staff will recommend the ANKAme Roof Anchor. Situated right on the front of the box is the following statement “To be installed and used by competent persons only”. The ANKAme (think ‘Anhcor Me’), is a very simple to use and install single point anchorage (15Kn) that complies with AS/NZ 1891.4:2009. One of the reasons why it is such a popular product is that it adapts to Custom Orb, Trimdeck, Spandeck and Concrete fix roofs. As the ANKAme temporary anchor point can be used multiple times it is a cost-effective solution for companies such as gutter cleaners, roof maintenance teams and companies that have staff climbing a variety of different types of roofs. The unique system allows the anchorage to be installed on existing roof screws so the waterproof integrity of the roof is not affected.
Who Is Able To Install ANKAme Roof Anchors?
Straight from the manufacturer’s mouth:
“The end user and installer need to be able to deem themselves competent or have contacted a competent installer.”
How To Install ANKAme Temporary Roof Anchors On A Metal Roof
- Identify a position on the roof to install the roof anchor that is between 800mm to 2500mm from the edge of the roof. The roof sheeting should have a minimum thickness of 0.42mm.
- Remove existing roof screws where required.
- Place into position.
- Fasten to the roof sheeting with the supplied fastenings. The product is supplied with 14-20 x 65mm timber purlins / steel purlins. Note that these screws are only appropriate for temporary installation onto steel or timber battens.
- For removal of the ANKAme the installation process can be reversed ensuring that the screws are fastened tightly to ensure a waterproof fit.
Here is a video of an ANKAme temporary roof anchor being installed on a metal roof:
The included paperwork with the ANKAme is easy to follow and there is a support line that can be contacted on 02 9666 1075. Once again, if you are in doubt call the professionals as there is no point risking serious injury or death by not asking for professional assistance.
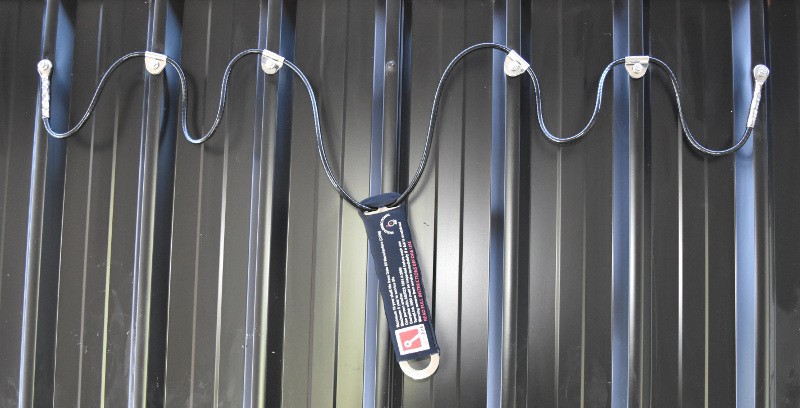
TempLink 3000 Temporary Anchor
The TempLink 3000 designed by Australian brand SafetyLink is an ingenious energy absorbing temporary anchor that is fast, compact, lightweight and easily relocatable. Ask any anchor point installer and they will highly recommend the multi-directional stainless steel design. Like the ANKAme the TempLink 3000 is rated as a one person anchor that complies with AS/NZS 1891.4. But the TempLink is widely regarded as a superior product due to the energy absorbing feature and the uncomplicated and secure features.
By absorbing the dynamic energy, the TempLink 3000 minimises damage to the structure and the reduction of the impact force reduces the risk of physical injury.
How To Install A TempLink 3000 Temporary Anchor On A Metal Roof
Probably the best line in the TempLink 3000 instruction manual is “read entire instructions before installing the product”. Even though the roof anchorage is easy to install, it is vastly different to other products on the market so it is important that you understand the installation technique before you commence the process.
- Assess the roof and identify a position that can be reached securely from a ladder or roof access hatch. The metal roof sheeting must have a minimal thickness of 0.42mm. The TempLink 3000 comes with a positioning layout guide as well as additional instructional guidelines.
- Remove six roof screws from the roof following the batten line, preferably at the crest of the roof sheeting profile (if this is not a viable option due to inaccessibility, the anchor point can be installed into the pan away from debris).
- Screw the 14(g) -10(TPI) x 65 hex head through the tabs of the TempLink 3000 into the battens through the existing holes. The manufactures emphasise the importance of ensuring the screws penetrate the timber by at least 35mm.
- The removal process is also simple, it just involves removing the screws and TempLink 3000 and reinstalling the screws ensuring a tight seal with the roof sheeting.
Here is an installation video produced by SafetyLink that highlights the installation process:
SafetyLink provides technical support via phone on 1300 780 545 or can be contacted on email at [email protected].
Some Startling Height Safety Statistics
Just because you are working on the roof a single story home or garage does not mean that it is not dangerous.
- Over half of the deaths that resulted from falls involved a distance of less than three metres.
- Falls from ladders accounted for the greatest number of fatalities.
- 232 workers have died from falls at work in Australia since 2008.
Warning: Read manufacturers instructions carefully.
For more information on the relevant roof anchor legislation visit the Safe Work NSW guide to roof anchors.
The Easiest Way To Install Permanent Roof Anchor Points
Certified roof anchor point installers undertake training and are licensed to install and provide certification for temporary and permanent roof anchor points. Not only do they know the right anchor points to install, but they also know the right locations to install the anchorages to ensure maximum convenience for workers. In a lot of cases, it can actually be more cost-effective for a professional roof anchor point installer to complete the job than to attempt it DIY. Why?
- Anchor point installers get trade price discounts from the manufacturers. If you can get a bargain rate on anchor points maybe this benefit does not apply.
- Anchor point installers can identify the ideal locations to install roof anchors, so less roof anchors are actually needed.
- Anchor point installers can instal permanent roof anchors which can be more cost-effective in the long run.
One downside of permanent anchor points is that they need to be annually certified to ensure that they are in good working order. As roof anchors are openly exposed to environmental elements, it is essential that they are routinely inspected and serviced. All components need to be inspected for signs of deterioration, specifically corrosion, distortion and expansion. When a professional anchor point installation firm certifies an anchor point they will issue a Certificate of Compliance for the property owner.