
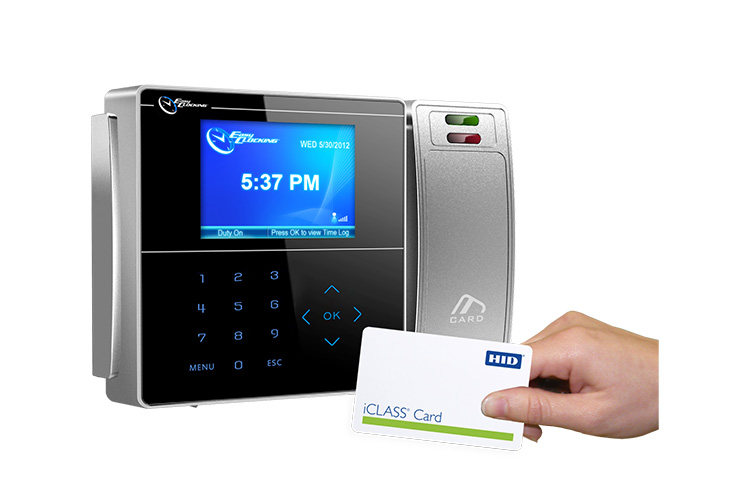
If you have just purchased an Easy Clocking time clock you will need to become familiar with the browser-based time and attendance software. The good news is that you do not need an IT degree to understand how to operate it. It has been designed with an easy-to-use interface that you will be able to master in no time.
This DIY guide will help you complete the initial installation of the Easy Clocking software. This process needs to be completed by all first-time users using the EC-200WIFI, EC-200, EC-500WIFI and Xenio-500 WIFI in order to operate the system.
How To Setup Easy Clocking Software
When you purchase an Easy Clocking time clock you will receive an email that includes your login details with predefined credentials including company ID, user ID and password.
You will need to login to easyclocking.net to access the browser-based software. Once you log in with your assigned credentials you will be able to change your password.
Note: https://easyclocking.net/ is the official login site for users of Easy Clocking software. http://easyclocking.com/ is the official retail and company website.
Once you have submitted your new password you will be redirected to the initial startup menu. This eight-step installation wizard will be different from the startup menu that you will see once you have completed the software initiation.
Tip: If you want a more comprehensive training program with a trained industry professional you can organise a consultation with a time clocks consultant on 1800 703 901.
DIY Software Initiation
Step 1 – General Terms & Conditions
Must be accepted prior to software use.
Accept the terms and conditions.
Step 2 – Company Details
This step allows you to enter your company name, the country that your business operates in and upload your logo.
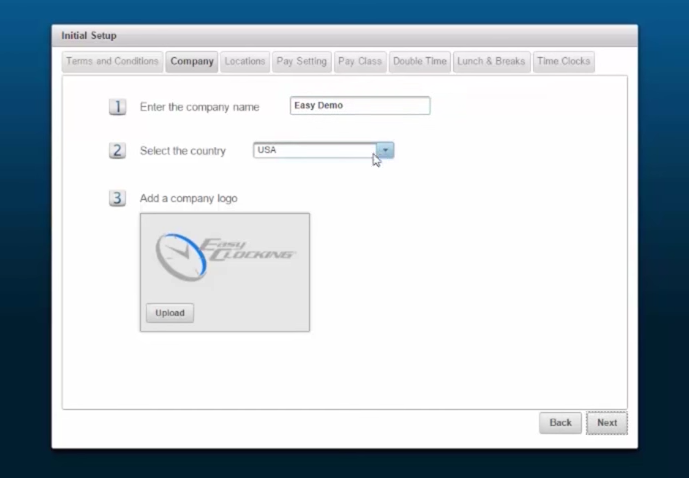
This can be changed later on by going to General Tab > Company
Step 3 – Company Location
You will now have to assign names for your company locations. If you only have one location, name your main office as “Main” or the city in which you operate in. Additional locations can be added later on which can help for referencing.
This can be changed by going to Settings > Locations.
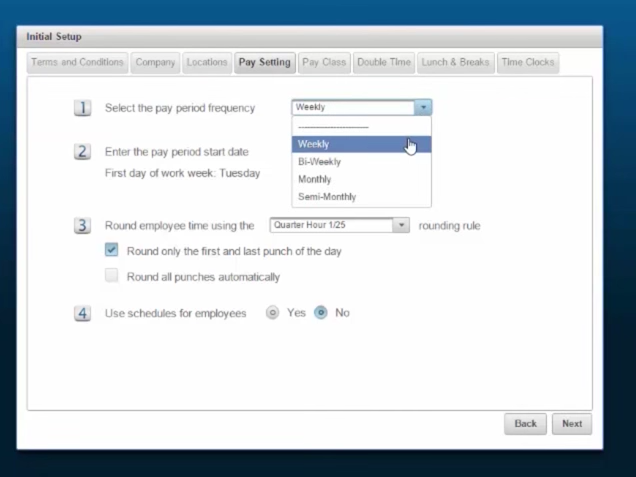
Step 4 – Pay Settings
- Add whether your pay period frequency is weekly, bi-weekly, monthly or semi-monthly.
- Enter the pay period start date.
- Select the ’round off’ rule for your company. You can decide on 15-minute increments or 6 minutes. You will also have to highlight whether you want to round off the first and last punch of the day or all punches during the day.
- If you would like to enable schedules to be set for employees, select the yes option.
Step 5 – Pay Class Setting
- Input what the maximum continuous hours that an employee can work within a shift.
- Do employees work late or night shifts that cross over two days? If you have shift workers whose shift stretches out over two calendar days indicate yes to this question. If this option is not selected and an employee works a shift over a two day period, the shift will be split up into two shifts.
- Do you pay overtime? Yes/No.
- If you provide overtime policies the following questions will need to be answered: How do you pay overtime? Hours in a day/ Hours in a week. What is the overtime rate?
All of these details can be changed in the future by going to Settings > Pay Class.
Step 6 – Double Time
Do you want to pay double time? You can input whether your company will pay double time after a specified period of time, after consecutive days in a week, or once accumulated work hours for a week reach a certain level.
Step 7 – Lunch and Breaks
Do you want the Easy Clocking time and attendance software to automatically deduct the time for lunch breaks? This may be against the legislation of some unions and States, so make sure you do your research before you select this option. You can also select at what rate you would like to pay your employees during lunch breaks.
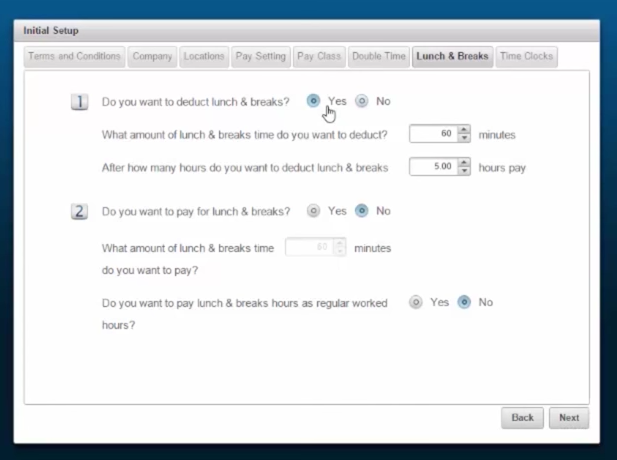
All of these details can be edited later on via Settings > Pay Class.
Step 8 – Register The Time Clock
Assign a time clock name, add the serial number and register the clock to the location on your profile. The time clock information can be found by accessing the time clock sub-tab of the data collection tab.
Press create.
As an administrator, you will now have full access to all of the systems on the Easy Clocking software.
Once you have completed the software initiation you will then be able to add employees to your system.
How To Add A Fingerprint On Your Easy Clocking Time Clock
This process requires the user to be enrolled in the system. Once a user is enrolled they will be assigned an ID number. Once this is completed you can commence with adding a fingerprint.
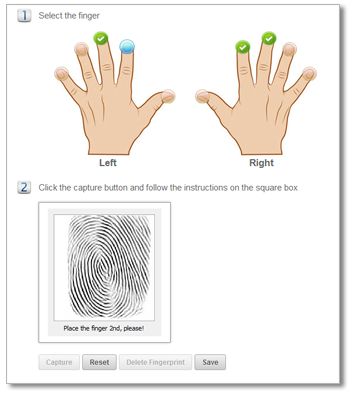
- Press the menu option on the time clock. Press OK to select User. Press OK to select enrol.
- Enter the ID number of the user to be enrolled.
- Choose the fingerprint enrollment verification type (the other options are card and password).
- The fingerprint scanner needs to upload three images of the fingerprint.
- Ensure that the finger is clean. Place the finger on the fingerprint scanner. Keep the finger in the middle of the scanner without applying excess pressure. Don’t move, slide or tilt the finger.
- The time clock will prompt you to lift and replace your finger on the fingerprint scanner.
- Once three clear scans have been achieved the display will highlight that your enrolment has been successful.
- If you want to repeat the process with an additional finger (highly recommended) repeat the process.
Who Is Easy Clocking?

Easy Clocking is a new name in Australia, but they are one of the largest producers of time and attendance systems in the United States. With Easy Clocking time clocks being used in over 50,000 companies and agencies in America, you can be sure you are dealing with a product that will add value to your business.
Operating in Florida, USA since 2007, Easy Clocking focuses on utilising the latest biometric technologies to reduce the paperwork involved in payroll processes and job costing. With a reputation for developing easy-to-use interfaces, Easy Clocking has seen a surge in use in the small business market. Time Logix, the purpose-designed small business time clock, was recently voted the #1 time and attendance solution for small businesses.
Bundy Time Systems
1 Lindon Ct, Tullamarine VIC 3043
bundytime.com.au
1800 703 901