
So you’re staring down the barrel of another Aussie summer, and dreading the light sleeps and brutal power bills complaisant with the balmy evenings. Could a whirlybird be the answer?
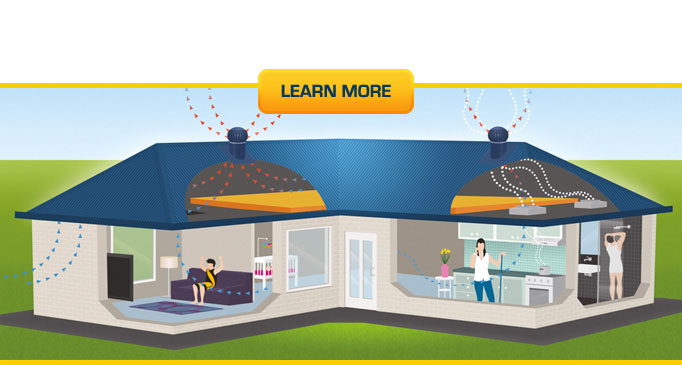
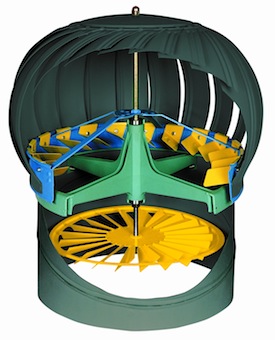
A whirlybird or ‘ventilation turbine’ works by sucking all of the superheated air from your roof space, replacing it with fresh, cooler air from outside. This continued rotation of air prevents your ceiling from retaining or emanating heat, ultimately reducing your interior living temperature during summer, and reducing moisture-related problems in winter.
You may be surprised to know that these ingenious spinning gizmos are relatively cheap to buy and hassle-free to install, even for your average DIY weekend warrior. Read on to get a basic understanding of the steps involved in completing your upcoming whirlybird installation project.
Step 1 – Preparing For Installation
Selecting the best location for your whirlybird depends on the unique characteristics of your own house. That being said, there are some fundamentals involved. Firstly, endeavour to choose the side or part of your roof that is most seldom seen.
Whirlybirds are not the most aesthetically pleasing part of your roofline, so most prefer to keep them inconspicuous. Once you have selected your location, measure the length of the side of the roof where you want to put your whirlybird.
If you are going to install multiple vents, they should ideally be equidistant, that is, evenly spaced from the edges of the roof and each other. For example, if the length of the roof is 21 meters and you want to install 2 whirlybirds, you could measure 7 meters to the centre of the first whirlybird, then 7 meters from there to the centre of the second whirlybird leaving a final 7 meters to the other end of the roof.
Vertically, whirlybirds are best situated close to the apex of the roof to capture and expel the maximum volume of rising hot air.

At this point, you’ll need to climb into your roof space so that you can mark your exact installation points on the underside of the roof sheets or tiles. This allows you to confirm that the whirlybird is clear from the roof structure including any rafters, trusses or purlins.
It may be necessary to move each whirlybird slightly to one direction or the other to accommodate for the all-important roof structure. Having defined precisely where the centre of each whirlybird should be, you can drill a single hole in the roof sheet at the centre point of each whirlybird.
Use the actual whirlybird to trace out the circular perimeter of the whirlybird cylinder to further confirm that your centre point is accurate.

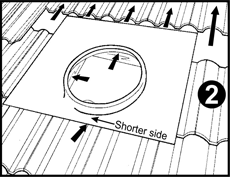
Step 2 – Cutting The Holes In The Roof
Now that you have drilled through from the underside of the roof, the holes will be visible from the exterior. At this point, take the whirlybird up to the top of the roof and place it centrally over each hole you have drilled, tracing out the perimeter of the cylinder on the outside of the roof sheet. Then remove the whirlybird, and starting from the centre hole, cut out the circle you have drawn.
For tiled roofs, the same principle applies, but you will need to cut each affected tile individually.

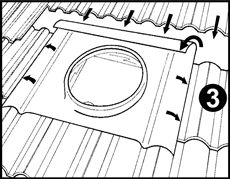
Step 3 – Installing The Whirlybird
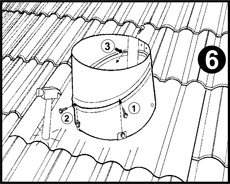
By now, the hardest part is behind you and provided the previous 2 steps were handled carefully; this third one should be relatively easy. Having cut out the hole, gently file off any burrs or rough edges from the newly cut material and clean the general area of dust and contaminates. Now slip the vent through the hole in the roof and finish assembling the vent as per the instructions in the installation manual provided.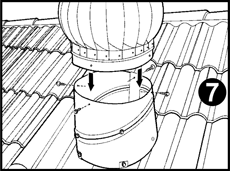
Additional roofing screws may be needed on steel roofs for attaching the baseplate to the roof sheet, and a sealant may be required around the edges depending on the design. As a rule of thumb, it is always best to rely on proper installation and flashing that channels the water around the installation, rather than on topical sealants or mastics.
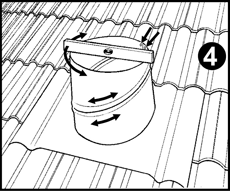
This is usually achieved by sliding the highest part of the base plate underneath the tile, ridge cap or roof sheet directly above your whirlybird. Most whirly birds are designed in this way anyway, so be sure to read the installation instructions of your particular product carefully.
Finally, before attaching the turbine on top, you’ll need to test that the level at the top of the cylinder is exactly correct by placing a spirit level on top. Carefully level both the east-west and north-south axis. You can adjust the level by rotating the top part of the cylinder one way or the other.
Once levelled, attach the turbine to the top and you are ready to go.
An Important Reminder
Since the whirlybird is essentially a vacuum that sucks the air out of your roof, it is crucial that adequately sized intake vents at the lowest point of the roof cavity are present to replenish the expelled hot air. Each whirlybird should come with instructions on the size of the intake vents required depending on the size of your roof and the number of whirlybirds being installed. Exactly how this is calculated is another subject all on it’s own.
It is also vital never to install one whirlybird underneath another. If this happens, the two whirlybirds can compete, with the higher one sucking the air out and the lower one acting primarily as an intake vent. This is both inefficient and counterproductive.
Why Go With Twista Whirlybirds?
If you’ve started to explore possible product types, you’ll no doubt notice that there are a plethora of options on the market. Choosing a good product is essential since the quality varies significantly between manufacturers. The quality of your whirlybird will affect how quietly and effectively it operates along with the products actual life expectancy.
Why not take a look at the roof vents available at https://www.twista.com.au/. This Australian owned and run company offers a higher quality, more hard-wearing product that is whisper quiet and guaranteed to keep your roof space cool in summer and dry in winter, saving you money and keeping you comfortable year-round.
If after reading this article you still need further assistance, don’t hesitate to contact Twista for an obligation free quote.
![]()
Twista Whirlybirds
Address: Ingleburn NSW 2565 Australia
Phone: 1300 797 714
Website: http://www.twista.com.au/